PLANTING WITH CHILDREN
If at all possible, we urge you to plant these marvelous seeds and seedlings with your children, your grandchildren, borrowed neighbor children and young people at outdoor and wilderness tripping camps. It’s increasingly easy for kids to assume that everything comes from a factory, or that “someone else” will take care of our future needs for a healthy planet, replenishment of raw materials, clean air, clean water, and natural places to go for relaxation and recreation that are not “built” environments. It might just be that the hands-on experience of planting several trees – making holes in the ground, placing seeds or seedlings in the dirt, covering them and hoping they will grow – will impart some “ownership” to kids doing this with you. They are the ones who can most affect the future for everyone, and so a sense of “ownership” in trees, in forests, in the idea that you CAN grow your own, in wilderness, in “effort in equals result out” could have major impact. This is also a wonderful and rare opportunity for older and younger generations to talk, to discuss what might be important to both groups. We hope the planting experience with kids produces trees AND great conversations.
WHERE TO PLANT WHITE PINE
• First of all, do believe that ANYONE can successfully plant trees! It doesn’t take any special skill – just some time, a bit of effort and common sense. Believe also that planting trees can be both fun while doing it and immensely rewarding as time goes on and they grow and grow and grow. I have sugar maples that are 40’ tall, white spruce that are 50’ tall and red pine (planted just 8 years ago) that are already 16’ tall. I planted every one of them by hand, and the satisfaction every time I see them is huge. The maples are now giving us sap each spring that we boil down and make into maple syrup. How fun is that?
• White pine grow best among other trees where the overhead canopy density is roughly 40 – 60%. However, they will grow very slowly in deep shade – they need an “opening” in the upper story to let sun down and to grow up through. They do adequately-to-quite-well in direct open sun if you are reforesting a clearing or a burned area.
• White pine are okay being somewhat solitary, unlike red pine which like to be in groups. Plant whites at least 30’ apart which is minimum spacing for mature trees. Or plant more densely and plan to thin out the weaker trees later on. Try to avoid creating a tree “monoculture” where all trees are the same and thus much easier for disease and deer to attack. There is always some disease, pest or predator working away at every species of tree somewhere. It’s really important to have diversity of species in any woods so that one organism cannot wipe out the entire forest. Plant whites – but also plant other native northern species in the same area so your forest is “multi-cultural”.
• Some folks plant a small triangle of seeds or seedlings – about 12″ – 15” apart – instead of just one. The idea is that one might not germinate or take root, one might grow poorly, and one will be the best. Plan to thin the triangle when it becomes obvious which tree is the strongest.
• Seeds, seedlings and potted trees MUST be planted in “mineral soil” – what the pros call “dirt”, and the sandier the better. Most northern forest floors have a top layer of “duff” – often 2″ – 5” of a lightweight blend of pine needles, molding leaves, dust, twigs, etc. Under that is either rock or dirt. Pick spots where the dirt is deep and wide enough to contain a full root system ten to twenty years out. Conifer roots grow outward at least to their “drip line”– where water would drip off the tree’s outermost branch tips. This sideways growth gives the tree lateral stability against wind and heavy snow or ice. They do not have “tap roots” (hardwoods do) that grow downward since they’d hit bedrock in most northern places.
• In order for mature trees to be a most effective seed-scattering source, they should be planted 100’ or more apart in order to cover more area. In the wild, try to avoid planting at campsites, on portages or along shorelines. By moving away from these easily reached sites and well into the woods you get the new trees to places of greater shelter and greater reseeding effectiveness.
• Make sure the dirt area chosen has natural access to moisture. If the dirt you clear or dig is bone dry today, it is likely to be so in the future. Plant in relatively or potentially moist soil. Whites like sandy, moderately moist soil best, so avoid moisture extremes like low, wet areas or dry hilltops.
• Plant a safe distance (a mature tree-length) away from cabins, buildings, tent sites, etc. Tall whites are often hit by lightning (which often jumps sideways too) and they can do awesome damage when they are blown over.
• Avoid planting where other whites already show blister rust or weevil signs (see “Aftercare” section) or any obvious stress. Rust infection is most likely in small forest openings, topographic depressions and at bases of slopes. Avoid areas with large deer populations unless you plan to use bud caps, fencing or other deer deterrents each fall (see “Aftercare”).
• Plant a nursery. You may want to take a cleared area and plant rows of seeds or seedlings maybe only 12” – 24” apart. Let them grow for 2 – 4 or more years and transplant the small trees to sites needing them. Have the new holes already dug and the soil wet. Lift each new tree with a spade (never by the trunk or stem). Get almost all of the roots and the dirt it has been growing in. Carry the tree in the shovel to the new hole and set it in with the trunk at the same soil level as it was at its old site. Make sure there are no air pockets in the dirt around the roots and tamp the dirt down. Ideally transplants should get a lot of water for several weeks if possible, though many will survive on their own.
• Record the sites where you planted, the soil and moisture conditions, methods used and subsequent weather. Compare sites, methods and weather next year to see what worked best in your location(s).
• Don’t expect “instant” trees. Seeds planted in spring might be tiny “puff balls” of needles by late fall. Both seeds and seedlings will grow very slowly the first several years – only inches per year as they acclimatize to their new surroundings. By year 6 – 8 or so they will start adding a foot a year – then a foot and a half. Seeds planted from August on may show tiny shoots or nothing at all the first year. Seeds planted from October on won’t even germinate until the next spring.
• Please source your seeds and seedlings as close to the place you will plant them as possible. Specifically ask commercial providers where their stock comes from. This both helps ensure that your trees will grow well in that climate, soil and location, and will prevent introduction of new species or specie variations not native to that region. To reforest in the best possible “native species” fashion, collect white pine cones from trees already in your chosen area, dry the seeds and then plant those seeds very close to the same place, just as nature might have done.
Note: Most seeds will keep for a year or more if they are dry (in a double plastic bag) and in the dark and cold of your refrigerator.
• Plant freely on your own private property. Do be sure to ask permission when planting at your neighbor’s, in common areas, in fields and forests and everywhere it seems white pine should be. Contact the US Forest Service District Silviculturist or reforestation expert in your area for help finding the best places to plant. Contact information for northern Minnesota:
Laurentian Ranger District (Aurora, MN) 218-229-8800
Gunflint Ranger District (Grand Marais, MN) 218-387-1750
Kawishiwi Ranger District (Ely, MN) 218-365-7600
LaCroix Ranger District (Cook, MN) 218-666-0020
Tofte Ranger District (Tofte, MN) 218-663-8060
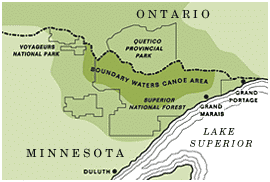
NOTE: Do NOT plant anything in any part of the Boundary Waters Canoe Area Wilderness or Voyageurs National Park. Both sites have firm rules against any such human intervention in natural processes. However, we have been encouraged by the Superior National Forest to plant appropriate species anywhere within the Superior National Forest EXCEPT in the part which is the BWCAW.
AFTERCARE – Will Reduce Mortality
It may seem strange that it helps to “garden the forest” but, if you are near your planted trees, here are several things you can do to help them reach that vital “maturity” stage where they are producing cones and seeds themselves:
• “Release” them often. Twice or thrice a summer, use clippers to prune back other competing brush, weeds and treelets. Ideally, keep your new white pines in a freed circle 2’ – 3’ in diameter – some experts say more like 9’ – 10’. Clip branches immediately overhead as well to let sunlight and air in.
• “Prune Up” the bottom branches of each tree once it reaches maybe a foot or more tall. Leave at least two-thirds of the tree volume intact, but get every single bottom branch because blister rust thrives in small, damp areas and those low branches touching or near the ground or duff collect and retain rain and dew long after the higher branches have dried. Move the clipped branches away from the trunk so they don’t keep moisture right there, but you do not need to fully remove or burn your prunings. Clip each branch just outside its raised “bud collar” ring with a clean cut straight up and down.
• Blister Rust will cause brown needles and raised, sometimes oozy blisters on branches and eventually on the trunk. Prune diseased branches immediately and well inboard (12” or more) of any disease signs. Pruned branches do not need to be removed from the area nor your clippers sterilized. The cranberry/gooseberry family (“ribes”) of bushes serves as the “vector” for the blister rust virus, so the likelihood of white pine surviving in an area of many such bushes is not good and most experts consider removing the vector to be impossible. Plant elsewhere.
• White Pine Weevil: The weevil lays its eggs in the leader shoot of the white pine where the larvae hatch and grow in late spring and early summer. Their presence is obvious because the leader shoot needles turn brown. Immediately remove the leader a good foot below the last browned needles and BURN IT at once to kill the larvae. Soon a nearby side branch will begin growing upwards and become the new leader shoot. That tree will survive.
• Deer Browse Damage: If deer nibble off the leader shoot and bud, prune the leader with a clean cut if it is damaged. A side branch will soon grow upwards to become the new leader. If this happens again, think hard about bud caps or other deterrents (see below).
• “Bud Caps”: Once a tree is about 6” tall you can apply bud caps in late September to keep deer from browsing off the top leader bud. Any kind of office-type paper 2.3” x 4.3” or so works fine. You can cut an 8.5” x 14” sheet in half the long way and then each strip into 6 sections. Fold the paper around the leader, putting your index finger in the fold and over the bud from the top. The bud should be 1/2″ below the cap’s top. Use any office stapler to hold the cap in place by catching several needles in the staple but leaving room for bud growth. Remove the caps each spring. Once the tree’s leader is over 5’ tall, caps are no longer needed.
• See Rajala, Jack: “Bringing Back The White Pine”, THE definitive book on planting and caring for these wonderful trees. Out of print but available in many area libraries. An article on Jack Rajala appears in the 2008 Spring edition of the Quetico Superior Foundation’s newsletter Wilderness News and is reprinted on our web site (https://queticosuperior.org/blog/a-man-of-the-trees).